


If you think of Napoleons as only dessert, I’m here to expand your horizons! I absolutely adore beets — not just their flavors, but also the range of colors they come in. Roasted beets are thing of beauty and their flavor and texture is a natural for pairing with a creamy cheese.
I was inspired to try this dish after seeing a deep red and yellow layered dessert. And, while I frequently sauté roasted beets in a pan with goat cheese and the beet greens as a way to embellish my dish, I wanted to incorporate blue cheese as part of this starter.
I had a ridiculous year of growing beets, and luckily, they will survive in the ground for quite some time. I wanted to make this as a fancy starter for a special meal, and the first place I went to for my beets was my own yard!
As you can see, I had some pretty good-sized ones to choose from!
But, in my plot, I really only grew the deep red “Detroit” variety and the stripped “Chiogga.” Chiogga is a terrific beet, but the layered Napoleon only really shows the outside edge where all the action of the Chiogga with its concentric circles wouldn’t show up. So, I wanted another color.
My local farmstand had some terrific golden ones — just the color I wanted to use for my dish in contrast with the deep red ones.

Since I’m going to use ring molds both to press out perfect circles of beets as well as assemble them, I wanted to start with beets that are roughly the size of the finished product I’m looking for. I don’t like waste and, while I would use the roasted beet scraps for another dish, it’s easier when you begin with similar-sized beets because the roasting times will be consistent.
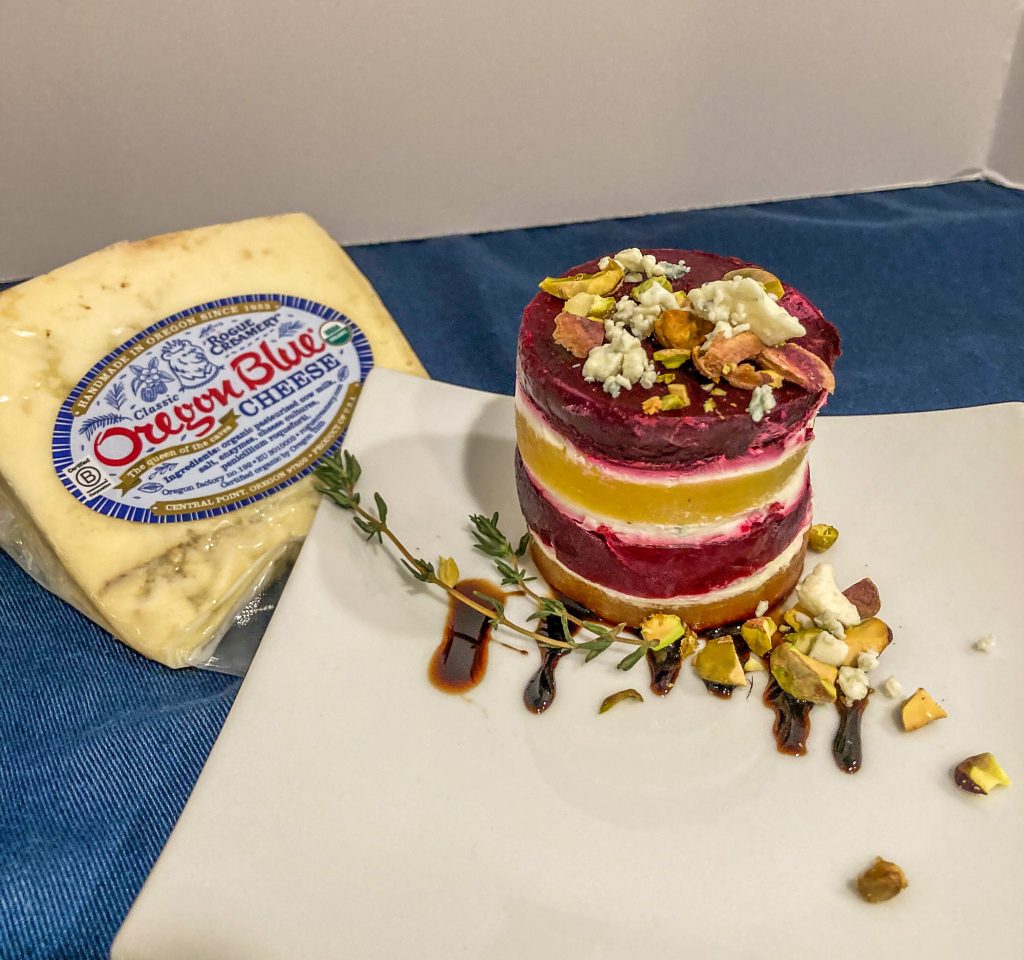
Other ingredients I needed to have for my starter were easy to find, too. A mild goat cheese, a creamy blue, some fresh thyme, parsley and a bit of honey would make up my creamy cheese mixture between my stacked beet slices. Now, I could have probably gone with all blue cheese here, but I chose not to because I wanted to have the cheese flavor to complement the sweet flavor of the roasted beets, not overwhelm them completely. A 50/50 blend of the two cheeses, along with the herbs and some honey to enhance the sweetness already in the beets was a perfect match! While there are several different blues you could use, ideally you want one that’s fairly “neutral” in flavor and has a creamy texture. I chose to work with Oregon Blue from Rogue Creamery on this one because it had those qualities I wanted.
So, while I was making the cheese mixture, I had the beets roasting in the oven. They are individually wrapped in aluminum foil so that the colors of the beets do not bleed into each other. I did not want red streaks in my perfectly golden beets.
Now, you’ll notice that, in the recipe, I do not provide you with a time for how long to roast the beets. That’s because it depends very much on the size of the beet. What I do tell you is, when you can easily slide a knife into the center of the beet, it’s done.
Remove the beets from the oven, allow them to cool, and then slide the skins off with the back of a paring knife.
Here’s where it gets fun: using mandolin or a very sharp knife, cut your beets into 1/4″ slices. The mandolin will be your best friend because you want even slices. Then, with a ring mold or a biscuit cutter, cut circles out of each of your slices. The ring molds are just about a “must have” piece of equipment for this recipe because you want perfect cuts and perfect stacks. If you don’t already have some, here’s a set I can recommend because they come in two different sizes, 4 per size, and they have a “pusher” piece for each size that will help you not only press down on the stacks, but it’ll help you unmold your beet stack once it’s completed. I find that, once I had ring molds, I would find excuses to use them so this is not a huge investment for something you’ll have endless fun with (I even use them for my crab cakes!)
Alright, so now you’ve punched out your perfect circles from your sliced beets and you are ready to assemble. Using the ring mold, place a beet circle in the bottom and then top with a bit of the cheese mixture. Spread that across the beet circle and then add the second beet circle (in a contrasting color, if you are using them). Using your “pusher,” press down on the second beet circle slightly — if you press too hard, you’ll squeeze out your cheese from between the beets. Next, repeat that with another smear of cheese, then another contrasting beet circle. Continue this process until you have four complete layers of beet and cheese, then top that stack with a final circle of beet.
Finally, unmold your completed stack, either to a serving platter or an individual plate, and then top with some chopped pistachios, some extra chopped thyme leaves, and a sprinkle more of blue cheese if you like. I also put a little balsamic vinegar glaze on the plate, just to add another pop of color and flavor, but whether you do this is entirely up to you.
As I mention in the recipe, when you unmold the stack, you may find that a little of your cheese mixture has weeped out onto the sides of the beets. Rather than panic, just grab a cotton swap, dampen it slightly, and just wipe the cheese off the beet side. Don’t stress about it too much; the beet stack will be so impressive that noone will notice if there’s a little creamy white encroaching on your colorful beet!
Now that you’ve read how to do it, I hope you’ll give it a shot. It may LOOK intimidating, but, as with just about everything else, one you have the right tools and instructions, it’s pretty darned easy. Give it a shot and let me know how it worked for you. I’d even love it if you’d share a photo of your creation in the comments!
Beet Napoleons
Equipment
- ring molds or round biscuit cutter
Ingredients
- 2 lbs beets (use a mix of golden, red or chiogga as desired)
- 5 oz mild goat cheese, at room temperature
- 6 oz mild blue cheese, at room temperature
- 2 Tbsp parsley, finely chopped
- 2 tsp fresh chopped thyme leaves
- 3/4 tsp honey
- freshly ground black pepper and kosher salt, to taste
- chopped pistachios (for garnish)
Instructions
- Preheat oven to 350° F.
- Wrap the beets individually in foil, and, when the oven is at temperature, bake them for one hour, or until a knife can be easily inserted into the middle of the beet.
- Allow beets to cool, then peel off the skin.
- Use a mandolin or sharpe knife to slice beet 1/4" thick. You want straight, even slices in order to best assemble the Napoleons.
- Once the slices are complete, use a sharp ring mold or biscuit cutter to cut even circles out of the beets. Set aside.
- Meanwhile, combine the goat cheese with the blue cheese until smooth. Add the thyme, honey and parsley and mix to combine. Finally, add the honey, then season with fresh ground black pepper and kosher salt to taste.
- Again, using an oiled ring mold or biscuit cutter, place a circle of beet inside. Top with a small amount of the cheese mixture and spread it across the beet circle. Place another circle of beet on top of the cheese mixture (alternating colors, if using), press down slightly and cover with another dollop of cheese. Repeat the process until you have four layers of beet/cheese, then add a final circle of beet on the top.
- Ease the Napoleon stack out of the mold and slice on a platter or individual plate. Repeat with the remaining beets and cheese mixture.
- Before serving, top each stack with a sprinkle of chopped pistachios and additional thyme, if desired.


